My first craft show was in 2005 for Johnson County’s Old Settlers. I was not prepared at all. I had just returned from study abroad a month prior. I thought I was ready, but I wasn’t. All these are things mentioned below are what I have learned year after year. I hope that my learning experiences will help you. Please feel free to make comments to help other readers and myself for future shows! Thank you!
PLANNING:
Planning for a craft show is not on a whim kind of thing. It may take some a month or two to prepare, and others six months to prepare. It all depends on the type of items that you are selling, and how much and quickly you can produce them.
For your first time, find a show that is local. Make sure that the show will have lots of traffic and know that it is well advertised, local or in another city. It’s not a good idea to not know much about the craft show, especially one that many may not have never heard of. Find out all the requirements. How much it costs? What are the hours? Is it inside or outside? If it’s outside, what do they do if it rains? Sometimes they require you to have Tax ID. If you know you will not be able to fill the space, ask the coordinator if they allow booth sharing. This especially helps when it is your first time at a show.
MAKE:
Make yourself a goal list. How many would you like to make per item? Give yourself a high number and a minimum number. The high number is your goal, the minimum number is the amount that you are okay with. Giving yourself a high goal is good, but do not be disappointed if you do not make that amount.
Give yourself some time to make your items. If the show is six months away, take a Friday off every month to help prepare, and the month of, depending on how you feel about the amount of items, take a couple days off right before your show. Leave at least half a day to pack all your items to put in the car.
If your items may be easily made outside, perhaps make it in front of your buyers. Many buyers love to watch. If you make glass beads, people love to watch how it works. Some buyers will realize how much work goes into all the items that you make, and would rather buy than to make it them selves.
APPEARANCE:
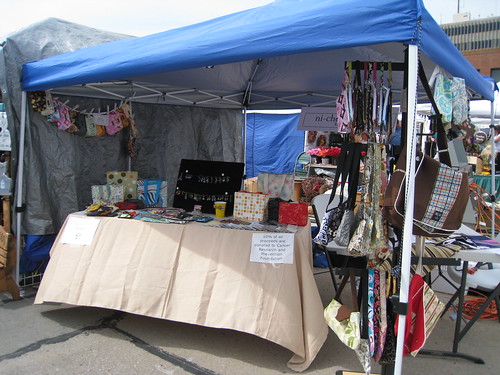
If it is an outside show, do some research to find a tent for less. Most booth sizes are 10’ x 10’. Look at sporting goods stores, Wal-Mart, Target, thrift stores, or maybe yard sales. If you’re going to be driving by a sporting goods store, stop by and take a quick look. You may get lucky! Check out craigslist too! If it is the week before the show, and you still don’t have a tent… I had found mine at a big box store for $100.
Make a sign for your booth. You can print black and white paper signs at Office Depot for under $5. Or if you have time, iron on or stitch letters on to your table cloth.
The appearance of the inside of your booth is incredibly important. If it looks cluttered, people will not willing to rummage through your items.
Make sure you have a tablecloth for your table - make sure it's ironed. I didn't iron mine, and it looks tacky. You can hide your boxes underneath, without buyers seeing them thrown behind you.
If you sell bags, have racks to hold them.
If you sell jewelry, have jewelry racks, or a small bust to display a beautiful necklace. – I have seen branches screwed on a small board. This is creative and fun.
If you sell aprons, have a couple mannequins to display some of the best looking aprons.
Find a folding table. Make sure that it is big enough to have all your items. If you need, find two.
There are usually local liquidation stores that throw away old racks, mannequins, etc. You may even ask the managers at certain stores in the mall. Just spice them up, paint them, sand them down, etc. whatever you need to do to make it look like to fit your style.
Have various heights to bring attention to different parts of the table. If you have a large tablecloth, have shoe boxes underneath or have various heights of racks on the table.
Try setting up your space (maybe not the tent, unless you do not know how it works) in your garage the day before to see how you'd like things to be placed. This way, you will not feel all scrambled the morning of.
Check out this flickr site of arts/crafts shows for ideas.
PRICE:
Pricing your items. There are some people that will walk away if they don’t see a price to your item. If they see that you are busy, they will not ask how much a certain item is.
You can individually price them with a sticker or tag. You may also have a small cardstock paper that says “$10 each or $15 for two”. Do not mark your items $1.99 or $3.49. The prices should round to the nearest dollar; but if you must, round it to the nearest half dollar.
It is your decision if you want to give a discount for more than one item purchased. Sometimes it gives them an incentive to buy more.
There are buyers who go with their friends that’ll notice that it’s cheaper to buy two and he/she would say to their friend, “Hey, it’s $X to buy two, I’ll pay for the second one”
I usually print my prices on a 4.25’ x 5.5” cardstock (this is a quarter of 8.5 x 11 paper). Then I print various prices that I might want to change to on mailing stickers. This way I can just stick on a new price on the cardstock, rather than crossing it out and marking a new price.
CASH/CHECK/CREDIT:
Make sure you have lots of one's. Many or All booths will refuse to give you change for one's. Also make sure you write down how much you had in your change box/purse before the show starts.
What do you accept? If you take check, make sure if has all their information on there, such as phone number, and look to see their ID. I always write down their driver’s licenses, just in case.
If you want to accept credit, there are various ways to accept it. See if it is worth the extra cost.
Here are some links to check out:
Propay
Costco
Sam's Club
IPhone has an app that accepts credit cards.
You may also check with your local bank to see if they offer sometime like this.
Edit (01/05/12): squareup.com
This is great b/c most places have you pay a merchant fee, but Square Up does not charge merchant fee. The card reader is free, and they only charge
2.75% fee on all transactions.
Works with iPhone, iPod Touch, Android phones and iPad devices
YOU (and how you act):
Dress comfortably, but look nice. Don't wear those comfortable jeans that you've had for the past five years that have holes all over the place. Look presentable.
Confidence. You need to feel confident. It will show. If you are shy, you will need to break away from it. Greet every single person that steps into your booth, even before they look at your items or if they do not give you eye contact. Greet them, make a small conversation. Even if they do not purchase anything, they will tell their family and friends about the nice person that makes such and such. Make the buyer feel at ease without you watching their every move.
CHECK LIST OF THINGS TO BRING: (feel free to add more to your specific needs)
• Pens/markers/sharpie
• Sign or banner
• Invoice book
• Twine (this is what I used to hang my banner)
• Scissors
• Labels and price tags
• Tape (scotch, duct, packaging, etc.)
• First aid kit (band-aids, pain relievers, eye drops, allergy meds, antacids - for all those funnel cakes that you scarfed down ;) , etc)
• Bags and packaging materials for purchases (you can customize them, or recycle the plastic bags that you have stocked up)
• Apron/waist pouch for change/cash box (with key)
• Plenty of change to put in your apron or waist pouch
• Wet naps and hand sanitizer
• Water and snacks
• Safety pins (you may need to pin your prices to the tablecloth if it’s windy)
• Calculator
• Mirrors for customers to use [especially if you sell jewelry]
• LOTS of business cards
• Business card holder (optional – you can set cards on the table if you’d like)
• Displays
• Tablecloths (optional - tape washers at some parts so it doesn't fly up every time a little wind passes through the booth)
• Camera – take a picture of your booth!
• Jacket (depending on the weather)
• Notebook for mailing list sign-up
• Table
• Lights (if the show will be running until dark)
I hope all these things will help you for your future craft show! Just remember have fun!
Last thing, do not beat yourself up when you do not do well on a show. Everything depends on the audience that your item attracts to. If one show does not work, try another. If you rather play it safe, try consigning at surrounding town’s stores. If a certain area does well, find a craft show in that town. Let the consigning store know that you’ll be there. Make postcards for the store to hand out. The publicity will help attract buyers that are interested in your items to your booth!
great post Nicole- thanks for putting it all together in one place:-)
ReplyDeleteAwesome advice! Thank you!
ReplyDelete