Showing posts with label tutorial. Show all posts

Sunday, December 9, 2012

How to Add the Like Button to your Blogspot page

There was a comment how you are more likely to receive facebook likes when you have the like button on your blog versus sending them to your facebook page for them to like you there. It makes sense, it takes away that middle step of opening another browser or sending them away to facebook... because we all know that when you're on facebook, you forget all reasons why you were suppose to do on the computer in the first place.


Alright, I had to ask Steve on how to do all this, since he's the computer guy.

Here we go.

Go here: https://developers.facebook.com/docs/reference/plugins/like/  (this will open another browser)

Scroll down to "Step 1"
When you enter in your facebook page, make sure you enter it like this : http://www.facebook.com/pagename -- for example, mine looks like this: http://www.facebook.com/nicherndesigns

Design what you'd like the "like" area to look like, with faces or not.

When you're done, click "Get Code"
You'll need both codes.  Keep this screen up, as you'll need to copy and paste.

Open another browser, you need to go to Blogspot.

Go to the template

Click "Edit HTML"


Click "Proceed"

Now click "Ctrl+f" -- we're going to find "/head".  
Go to the facebook code page. Copy the first code, and paste it after the <  body .....  - see where i used the giant arrow in the image? post it there.

Click save template.
Now, go to the blogspot layout. click "add gadget" to where you'd like the like button to be located on your blog. Add the javascript option, then paste the second code from the facebook code page.
save.
and that should be it!
Let me know if you have any questions!
and show me your like button! ;)

Tuesday, June 12, 2012

DIY Bowling Set


DIY Kids Bowling


You know these little puffs that babies eat?
These: 
pic source
You probably have seen the Gerber brand too. We just purchased the Up&Up brand from Target for our boys when they were little

Well, it wasn't until Child #1 was older that I had the idea to keep the containers! I think I had about 3. I kept them in the pantry, it sat there for a long time! Then with Child #2, I kept them. I kept total of 12. Now, Child #2 is almost 2, and he has not been eating those puffs for a long time now. I figured it's time to do something with them now (finally).

Last weekend, I finally went to the pantry (it was getting a little messy), took the containers and rinsed them.
I purchased some colored electrical tape from Walmart for $3.97.

I taped the lid to the container with the white electrical tape so it wouldn’t pop off.

Then I tapped the red tape about quarter inch below the white tape, another red stripe about half an inch below the first red stripe, I just made sure that the whole width of the tape was not completely in the concave part of the container.


I had a little help too. Child #2 was determined to get these open! No puffs in here honey!

The red tape was just enough for all 10 containers! Yay! Perfect!


We got a ball that would light up if you bounce it hard enough from Target for $3. We thought it would be fun with the ball lighting up as you bowl.
pic source

Child #2 just wants to knock them down every time I set it up. He laughed and got pretty excited when he knocked them all down! 


Child #1 would sit 2 ft from the pins to bowl. (oh and please ignore the terrible loveseat fabric cover)


Bowling is still a concept we’ll need to figure out. We’ll have to work on it. :)

Such an easy way to reuse the baby puffs containers!!

Linked at:


Somewhat Simple

Thursday, June 7, 2012

How to avoid getting hacked


Our IT guy at work sent this to us.
I revised it to relate to you and such. But this is really helpful!

Have you ever wonder how someone got your password to your facebook, twitter, e-mail, etc.?

Here is one way that they would have gotten all the information from you.

Sometimes you get an e-mail that may look like this (especially if you use Verizon), but this is an example. You may have gotten other brand/company of e-mails.


This is a screenshot Phishing email that has made its way past email spam filter.  From time to time these get through.
If some do happen to get through here is an easy way to tell if it is phishing.

TIP: Hover over one of the web links to see where it goes (DO NOT CLICK). If it is going to any other than the company it should go to it is probably phishing.

                Q: What are they phishing for?
                A: your login information so they can take your money.

Make sure you took a good look at the image, click on it if you need to. It's hard to tell if it's even spam, doesn't is, and the hovering of the link really makes the difference! But most people don't hover to see where the link takes you...


This is what happens if you click on the link:

1. One click on the link and get taken to a website that looks just like Verizon’s but really it is the Phishers website.
2. You try to login but usually get a message saying the userid or password  is in-correct.
3. You then try all of the login ID’s and passwords that you may have ever used.
4. In the background the Phisher is collecting all these login ID’s and passwords along with what city your internet connection is coming from and stores it in a database.
5. Then over time they take that information and through a program try to login to Verizon, Gmail, Yahoo, Facebook, Twitter, Linked In, dating sites, Ticket master, Amazon, Wal-Mart,  and any other global popular websites , especially social sites, as you to steal information about you to use later.
6. They also take those logins and try to login to national banks, investment firms and any other financial institutions hoping to transfer all of your money to them.
7. Then they take your logins and location information to attempt login to local banks and financial institutions, again hoping to gain access to your money.

Q: How do they have time to do all this?
A: They don’t. But they did have time to write a software program to do it all for them.

Remember with Phishing: If you are not sure where you are going, you are already lost.

Always hover over links! If you don't feel comfortable with it, then open a new window, and type in the link yourself and go through there.

Here is a website with tips on protecting yourself from the Phishers' trap!
http://www.focus.com/fyi/44-ways-protect-phishing/

Wednesday, February 15, 2012

Tutorial - Pin-It Button in post footer


Ok, so here's a little more info on how to add your very own Pintrest button to your post footer on Blogspot. I have no idea on Wordpress or other Blog sites.  If you know how, please let me know and I will link you to my post.

We're going to edit the post template, and if you're not comfortable monkeying with the nuts and bolts, you might want to take a deep breath, meditate or what ever you need to to do to prepare yourself, cause we're going to be editing the raw HTML.  Don't worry, I'll hold your hand through this.

Click the 'Edit HTML' button and 'Proceed' right through all the warnings.


Make sure the  "Expand Widget Templates" is checked.


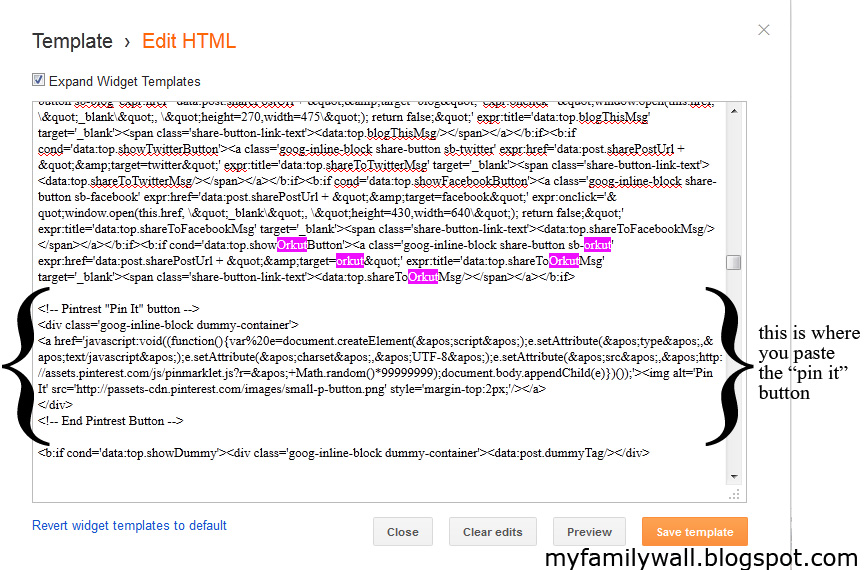
Now the tricky part... you'll have to find the place in the HTML to copy the following script.

<a href='javascript:void((function(){var%20e=document.createElement(&apos;script&apos;);e.setAttribute(&apos;type&apos;,&apos;text/javascript&apos;);e.setAttribute(&apos;charset&apos;,&apos;UTF-8&apos;);e.setAttribute(&apos;src&apos;,&apos;http://assets.pinterest.com/js/pinmarklet.js?r=&apos;+Math.random()*99999999);document.body.appendChild(e)})());'><img alt='Pin It' src='http://passets-cdn.pinterest.com/images/small-p-button.png'/></a>

Since we're going to drop the new Pin-it button right next to the other social media links, look for the Orkut button in the post footer widget template.

Do a search (ctrl+f on PC) for "Orkut"

You'll want to place it directly after the </b:if> tag, and before the next <b:if> tag that wraps the Google button.


Now save your template, and enjoy your new Pin-it! button!

It should look something like this:


I hope this was easy to follow tutorial on adding your own Pin-It button in your post footer! Let me know if you get it added! I want to see! :D


-----

I added this to some link parties:

Tip Junkie handmade projects

Saturday, January 28, 2012

Shoulder Heat Pillow Tutorial

For Art Gallery Fabric Challenge of 2012, January's Challenge was to come up with a heat therapy pillow.

I'm 5'-0" ... I am vertically challenged or "fun size", and I'm a sloucher!! It does not help with my height. So, my shoulders are always aching from slouching, hold the kids, sitting in front of the computer slouching.... it's mostly the slouching.

I decided to come up with a shoulder heat pillow. It can also be used on your tummy for those days where it just cramps all over. It works best when laying down and not doing any housework for those lovely days. ;)

Now... on to the tutorial!

Here are the supplies that you need:
1/2 yard of fabric
~ 10 1/2 cups of flax seeds (or buckwheat or rice)
~ 7 tablespoons of dried lavender (or dried chamomile)  -- this is optional

Go here to get the pattern that I drew out. It should fit on two 8.5 x 11 sheets. You'll see two dashes on page 2, that's where the first page should line up with the second page.

Step 1: Cut 2 pieces from the pattern from the 1/2 yard of fabric

Here I used Flower Bed Blush from Art Gallery Fabrics' Coquette collection


Step 2: Line up the two pieces with right sides together and sew all the way around until you get to one side of the C-shape.
Leave about 2 1/2" inches open on one end.


Step 3: Turn the right side out. I would mix 1 1/2 cup with 1 tablespoon of dried lavender.

 Step 4:  Pour the 1 1/2 cup in the C-shape, then I'd pin the flax fabric to keep the flax seeds in place. It helps to have a funnel.


Step 5: Stitch the along the pins, you want the flax seeds to have some room so it's not so bulky and it would sit on your shoulder better than a big chunk of seeds. In the picture below, I had the pins pretty close to the flax seeds, then I'd stitch to where the foot would barely touch the pins giving the flax seeds room after it's stitched.

Step 6: After your last flax seed fill for the pillow, close the 2.5" opening by turning a little bit of the opening fabric in.

That's it! Heat it up in the microwave or put it in the freezer. Don't just leave it in your microwave and walk off! Heat it 15-20 seconds to see if that's the warmth you like... and repeat if you want it warmer. It may be too hot to handle if you toss it in for too long! And I don't want anything to happen to you if that happens!


I had added an applique to my pillow as part of the challenge. I traced the poppy flower. I used Labyrinth Lilac from Art Gallery Fabrics'  Hyperreal Garden collection.


 -----

Now here are some things that I did that you may or may not want to do.
Because flax seeds look like bugs, and I'm not a fan of bugs. If I see one, I'm spraying the house or calling the exterminator!
So, I zig-zag after stitching in Step 2 in case any flax seeds decides to escape, and I freak out because it looks like a bug! You could probably see the zig-zag stitching in the picture. This is totally up to you, you can go back and stitch zig zag if you want.

If you do not want to worry about the pins on keeping the flax seeds in place and stitch 7 times and just leave the flax seeds loose, you can. I did it because it keeps the flax seeds where you want it, it evenly distributes the heat on your shoulders.  That is also optional.

Make this for you and what works best for you!


-----

I hope this tutorial works out for you, and please do not hesitate to let me know if you have any questions about this tutorial!

Please only use this for personal and not to sell.

If you found this tutorial helpful, please take the time to let me know by leaving me a comment. Your comments give me the encouragement to continue creating for you!

Wednesday, January 25, 2012

Sewing Machine Maintenance

I'm quite embarrassed about this.
My sewing machine was bought in 1996, Brother XL3010. It's been with me for a very long time.
The machine has been getting louder as years ago by, and clunking a lot. S says he can hear it 2 floors down, even with the door closed! It's like a construction zone!
I was almost to the point of buying a new one! But! I decided that last night that I needed to opened it and cleaned it out. First cleaning! They didn't teach this to me in 8th grade sewing class! I had to clean the machine?!  In 8th grade, I did not know anything about maintenance for these things. I just sewed. I mean, that was the point of the machine right?


The top isn't too bad. Except there was thread in there at the gears... stuck in there...


This 16 year old bunny needed to go!!

It is cleaned out. Grabbed a q-tip, dipped it in oil (for sewing machines).

Arrows are where you should dab the oil at


Arrows are where you should dab the oil at

I also read that if you use it more than one hour a day, you should dab oil daily!
Make sure the machine is unplugged when you're cleaning. After dabbing the oil, let the machine run super fast for 45 seconds to a minute. to get the parts all greased up!

The machine now does not sound like a jack hammer, it sews much smoother... I'm so incredibly happy that I cleaned out the dust!!

If you are an avid sewer sew-person... I hope you do not have a 16 year old dust bunny hanging out with you.

p.s. do not ask me why I waited this long to clean it out. Desperation maybe?


-----

edit: Here is a blog post from We All Sew about not using canned area

Friday, December 23, 2011

Frame Art for the Holidays

We don't have anything up on our mantel, and I wanted to do something.

I got my inspiration from this picture:


But I wanted to do something a little different.

I went to Hobby Lobby, found red poster board, white scrapbook cardstock, and 18x24 frame.

I got lucky. Everything was on sale!
Red Poster Board - $.50
White Scrapbook Cardstock pack - $4  -- I only used 3 sheets of 12x12
18x24 frame - $17.50
Mat and cutting - free (S's dad had extra and cut it for me too!)  I think you can get 1 cut for $1 at Hobby Lobby - I'm not sure though.

I spent a total of : $22

I sketched up what I wanted to do.  As you can see I just grabbed whatever I could find on the table!


I had used Cricut Cutting Up Cartridge for the lettering.


I put it all together last night. I had to revise from what I sketched, I moved the "to the" next to Joy because I didn't have room for "the Lord" to be on one line... I still think it turned out nice.


S said it has the 'Dr. Seuss' look. I have to agree. It's cute, and I'm happy with it!

Our mantel is very sparse, so, I'm trying to do something every year. :)

Wednesday, December 21, 2011

Bows Tutorial

Four days before Christmas! I'm sure everyone is starting to wrap their presents! BUT you forgot to buy bows! Oh No!!! No worries... take a deep breath. Do you have 5 - 8 minutes to spare? Yes? Well! This bow making tutorial is just for you!

I made some bows with some blueprints from work.


They are super easy to make!

If you have scrap paper that you don't really want to throw away or even your child's scribbles... or progress reports from work, or notes from your teacher to your parents, ... any paper would be perfect to use for this simple project!


Cut stripes. I had cut 3/4" and 1" strips. 
11" is too long, so trim it down to about 9" or 9.5"
Fold the strip in half.  Twist one end of the paper to the folded line. Tape the one side down. I used tape, but you can use glue if you want to. Do the same thing to the other side of the strip. Twist two of the 9" strips like this. Tape them crossed on top of each other. I'm not sure if you can see it well in the pictures below.


For the next three strips, cut them at 7". Do the same thing, and tape them to the base of the bow that you started with the 9" strips.


I think 5 strips look the best. You can vary the width of the bows to your liking... but now you know how to make them!!

Saturday, June 18, 2011

toddler pillow cover

Currently our 2.5 yr old has a 12x12 pillow, it's getting a little small for him. So, I stopped by Joann's over lunch one day, and picked up a 16x12 pillow.
Since I was making pillow covers, I decided to make a couple for a co-worker's (Lori) toddler since we've been talking about pillows.

Here is a quick tutorial. This should take less than 1 hour. I did four in about 2 hours. This pillow case cover is what I call "envelope" cover. I'll be taking photos tomorrow of D with his pillow to give you a size reference.

Here are the supplies that you need:
21" of fabric (I used blue minky, Lori went with flannel)
16"x12" pillow


I usually have the sales rep cut a little larger, just in case they don't cut straight.

Step 1: For your pillow, cut 19" x approx. 31". I say approx. 31" because some people like larger hems, and some like smaller hems. So, it's really up to you.
Step 2: Hem the two shorter sides. I usually hem it 1/2".
Step 3: With the right side facing you, fold the 9" side first (this is the side that you will see). Then fold the 8" side second. Just make sure that you have 11.75" in the middle. Why 11.75" instead of 12" because that's the size of the pillow? You can have it 12", but I noticed that when I do 12" instead of 11.75", the pillow cover looks "saggy". And I like a nice tight cover for my toddler, and not bunching up fabric when he lays on it. This is all preference too. If the extra .25" doesn't bother you, go right ahead! Don't worry, I wouldn't even know if you did decide to add the .25" ;)Step 4: The fabric is all folded and it is inside out. Mark your lines of 15.75" I usually just make sure there is 15.75" in the middle. I usually don't measure out from the sides because the minky fabric is quite stretchy. I just make sure I smooth it out from the middle.
The 15.75" is the same reason as above for the 11.75".
Step 5: Stitch the marked lines. I usually double stitch the overlaps of fabrics. I'm pretty hard on these things, so, I want to make sure that I don't break a stitch when I'm stuffing the pillow in.

Step 6: Turn the fabric inside out, and voila! You have your pillow cover!!

Here are the pillow covers that I made for Lori's daughter.


D with his pillow, as he's watching Umizoomi.

Let me know if you have any questions!  If you make one, two, or more; take pictures! I would love to see them!!!

Please use this pattern for your personal use.

If you don't have time or know how to sew, you can now purchase a pillow cover now in my shop!

If you found this tutorial helpful, please take the time to let me know by leaving me a comment. Your comments give me the encouragement to continue creating for you!

LinkWithin

Related Posts Plugin for WordPress, Blogger...