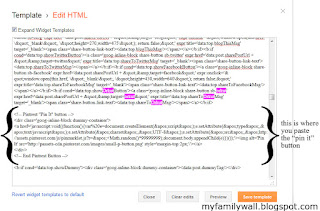
Ok, so here's a little more info on how to add your very own Pintrest button to your post footer on Blogspot. I have no idea on Wordpress or other Blog sites. If you know how, please let me know and I will link you to my post.
We're going to edit the post template, and if you're not comfortable monkeying with the nuts and bolts, you might want to take a deep breath, meditate or what ever you need to to do to prepare yourself, cause we're going to be editing the raw HTML. Don't worry, I'll hold your hand through this.
Click the 'Edit HTML' button and 'Proceed' right through all the warnings.
Make sure the "Expand Widget Templates" is checked.
Now the tricky part... you'll have to find the place in the HTML to copy the following script.
<a href='javascript:void((function(){var%20e=document.createElement('script');e.setAttribute('type','text/javascript');e.setAttribute('charset','UTF-8');e.setAttribute('src','http://assets.pinterest.com/js/pinmarklet.js?r='+Math.random()*99999999);document.body.appendChild(e)})());'><img alt='Pin It' src='http://passets-cdn.pinterest.com/images/small-p-button.png'/></a>
Since we're going to drop the new Pin-it button right next to the other social media links, look for the Orkut button in the post footer widget template.
Do a search (ctrl+f on PC) for "Orkut"
You'll want to place it directly after the </b:if> tag, and before the next <b:if> tag that wraps the Google button.
Now save your template, and enjoy your new Pin-it!
 button!
It should look something like this:
I hope this was easy to follow tutorial on adding your own Pin-It button in your post footer! Let me know if you get it added! I want to see! :D
-----
I added this to some link parties:


Worked like a charm! Thanks for the easy instructions! http://mysocalledgreenlife.com
ReplyDeleteYay! And it looks fabulous!! :)
DeleteFinally! Instructions I could follow and get right the first time! Thanks so much!
ReplyDeleteI'm so glad that it's easy to follow! :D
DeleteAWESOME! Thank YOU!
ReplyDeleteAngie
http://www.littleinspiration.com
It looks awesome! :)
DeleteThanks for this funny :) tutorial. Liked your introduction (holding your hand...). It worked great. Thank YOU. Sandra
ReplyDeleteThank you so much!!! Only after reading your tutorial did I get it to work. :)
ReplyDelete